
Handwriting and fine motor skills are crucial for children’s participation in many classroom activities, from writing and drawing to using tools like scissors and rulers. These skills rely on the development of hand strength, coordination, and control, which can vary greatly between children. School staff can play a key role in supporting fine motor development by incorporating targeted activities into the daily routine and adapting tasks to meet individual needs.
What Are Fine Motor Skills?
Fine motor skills refer to the ability to make movements using the small muscles in our hands and wrists. These skills enable us to do key tasks in school, at work, and in everyday life.
Examples include:
- holding a pencil and drawing pictures or writing neatly
- using a keyboard
- using scissors, rulers, and other tools
- manipulating containers
- getting dressed
- brushing teeth
These small movements come naturally to most people, and therefore we don’t usually think about how we do them. Fine motor skills are complex. They involve a coordinated effort between the brain and muscles. Fine motor skills are built on the gross motor skills that let us make bigger movements, like running or jumping.
Have a look at our Universal Fine Motor Skills Programme designed for use at home or in school, which has lots of ideas to support the development of fine motor skills.
Our Fine Motor Skills guide offers further ideas and a hand exercise programme. This programme would be appropriate for primary school children, from 4 years old onwards.
Fine Motor Ideas for Older Kids offers some ideas for older children.
Our Occupational Therapy Resources Booklet also contains sections on fine motor skills and handwriting with ideas for home and school.
Click on the topics below to learn more about how to develop fine motor skills.
To develop fine motor skills, a child needs a strong base of support, namely in the trunk (body), shoulder girdle and arm.
Difficulties in this area include:
- holding their arm away from their body when doing fine motor tasks
- having tension in the shoulder when completing a fine motor task (such as threading, handwriting or cutting)
- using whole arm movements for colouring and drawing, instead of hand movements
- pressing too hard on their pencil when writing or drawing.
It is important to build strength in the larger muscles of the trunk, shoulder and arm to create a good base of support before focussing on the smaller muscles of the hand and fingers.
We learn and explore through the use of our hands and senses, therefore, having good fine motor pinches and grips allows us to explore further, perform tasks independently and engage with objects in our environment.
How you can help
Suggested strategies and activities for grips and pinches are:
- board games that promote small movements of the hand, such as Jenga or Operation.
- tweezer and tong activities
- posting small beads or buttons through a small hole
- stringing beads - make a necklace or bracelet while holding several beads in hand at a time. Start with larger beads and work towards smaller sizes as the child improves
- lacing cards
- peg activities
- practicing doing up different fastenings and buttons
- using droppers to drop water or paint
- drawing with short pieces of chalk and crayons
- painting with cotton wool or paint brushes
Make it challenging for the child but not so hard that they get frustrated and decide to give up! This may feel tricky to get right at the start but keep trying!
In-hand manipulation is the ability to hold and move objects within the hand. This is important for more complex fine motor tasks such as handwriting, using cutlery, doing up shoelaces and doing up fastenings.
How you can help
Suggested strategies and activities for in-hand manipulation:
- put small objects in play dough such as coins or small beads. The child needs to find the small beads in the clay. Once a bead is found, move it into the palm of the hand. When 3 beads have been found remove them from the palm and start again.
- recycle an old plastic container like a margarine or pringles can. Cut a slot in the top. Have the child hold several buttons in one hand. Practice putting the buttons into the slot.
- give the child a snack of a small food like raisins. Put the raisins in the child's palm. Instruct the child to eat one raisin at a time moving the raisin from the palm to the fingertips to the mouth.
- put coins in a piggy bank that are in the palm of your hand.
- get coins out of a purse.
- crumple up paper using one hand.
- lace beads onto a string while holding the beads in the palm of the hand.
- pick up small objects from a table with one hand only.
To cut with a pair of scissors, children require:
- postural stability (feel stable in their bodies)
- hand strength and dexterity (hand strength and ability to make small movements)
- hand-eye coordination (be able to see and understand what your hands are doing)
- bilateral integration (moving both sides of your body at the same time)
- sensory integration (being able to understand the feedback from our bodies)
- sequencing (being able to do something first, then something else etc.)
- attention (being able to focus on a task for a certain length of time)
How to help children get ready for cutting:
Consider how the child is sitting before the task begins. A good sitting posture for fine motor activities is:
- Check that the child is sitting appropriately, for example, with feet flat on the floor and hips, knees and ankles at 90° angle
- The table should be at a comfortable height
- It may be easier for your child to lie on their tummy or to stand to complete pencil activities rather than seated at a table
How to help with scissors:
- Ensure that you provide them with the correct scissor of an appropriate size. Left-handed scissors are available for left-handed children.
- Provide opportunities for tearing paper.
- Place scissors in a "thumbs up" position from the very beginning. This means the thumb is in the little hole and is on top when cutting, rather than twisting the forearm inward and snipping with the thumb on the bottom.
- Try using a visual cue to help the child understand proper hand positioning. If the child struggles with placing their thumb up when holding the scissors, you can place a sticker on their thumbnail or draw a little happy face on it.
- You can also place a little sticker on top of the thumb hole of the scissors, or even wrap the top thumb hole with some electrical tape, masking tape, washi tape, etc.
- Use hand-over-hand assistance (place your hand over the child’s) if needed when getting started.
- Opening scissors may be more challenging for beginners than closing them, especially if the scissors are too big for their hands or they have weakness in their hand.
- They may need help opening them each time when starting out. If you help kids get their scissors into the open position over the play dough.
- Try spring-loaded scissors if opening regular scissors creates too great a challenge or too much frustration.
- Start out by snipping play dough, straws, crinkle paper.
- Start with cutting on a wide line (around ½ inch thick) that's just 2 to 3 inches long, then progress to circles, followed by corners and more complicated shapes.
- It is easier to cut on cardboard paper as it offers more resistance and is easier to manipulate with the non-dominant hand. Small pieces of board or paper are also easier to manipulate than an A4 page.
- Tell them exactly how many cuts or "chomps" they will make with their scissors.
- Teach them that they need to "push" their scissors forward after each snip.
- Place stickers along the path to provide additional visual guidance for where the scissors should go.
- Make sure they are starting on the correct side of the shape. Righties need to start cutting on the right side of the shape (moving counterclockwise). Lefties need to start on the left side of the shape (moving clockwise).
- Place stickers at the corners when cutting shapes with angles, and teach the child how to "STOP!" when their scissors cut the sticker.
These tips were originally published in the MamaOT.com article: Developmental progression of scissor skills: 35 best tips for teaching kids to use scissors.
Handwriting is not a simple task and takes a variety of complex and intricate muscle movements and visual perception skills. Whilst it is less important than it was, it is still a skill that would be useful for children to develop and feel confident with.
Pre-writing skills are essential foundations for reading and writing. Ideas and guidance to support children to develop and strengthen these skills can be found in our pre-writing programme.
Have look at our video on Theraputty Exercises for Hand Strength & Proprioceptive Input to develop hand strength.
The necessary skills required to produce writing are usually acquired in early school years and honed over the remainder of their time in school.
5 ‘Ps’ of handwriting are the key areas to work on when developing handwriting:
- Posture
- Pencil grasp
- Paper position
- Pressure
- Placement & Letter Formation
All of these points are covered in the following video by our team:
Practical Strategies to support Handwriting Training – for teachers SEN OT Service Introduction to Handwriting for Key Stages 1 & 2
1. Posture
Sitting in a good, comfortable position with a stable base will enhance the child’s concentration and ability to control the pencil.
- Upright comfortable sitting position - back supported
- Hips and knees at 90 degrees
- Feet flat on the floor/footrest
- Chair tucked in
- Forearms resting on the table
Also:
- If the child cannot touch the floor with their feet flat, use a footrest (e.g. a wooden block, upturned box, etc.).
- Check if the size of the chair and table is suitable for the child’s height.
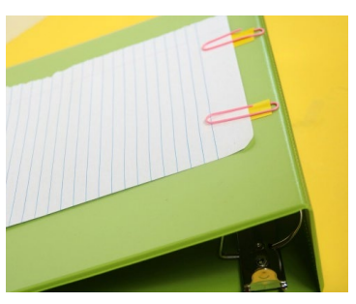
- If the child is slouching, try using a move 'n sit cushion and an angled writing slope (or an A4 ring binder with a matt surface)
- Practice handwriting using vertical surfaces, e.g. standing up with sheet taped to the wall or use an easel or whiteboard/chalkboard.
- Shoulder strength and stability are important for improving hand function. Activities to strengthen the shoulders include wall and chair push-ups, lifting a big ball overhead and throwing it to a target, and activities that involve reaching above head height (e.g. arranging bookshelves).
- To help with attention, offer movement breaks.
2. Pencil grasp
Having a functional pencil grasp allows the child to hold and move the pencil with ease and comfort which supports writing legibility and speed.
A functional grasp doesn’t need to be a perfect tripod grasp, it just needs to be one which is efficient for writing. Please see photos below (Taken from Berkshire Health Care Training presentation on Handwriting Essentials)
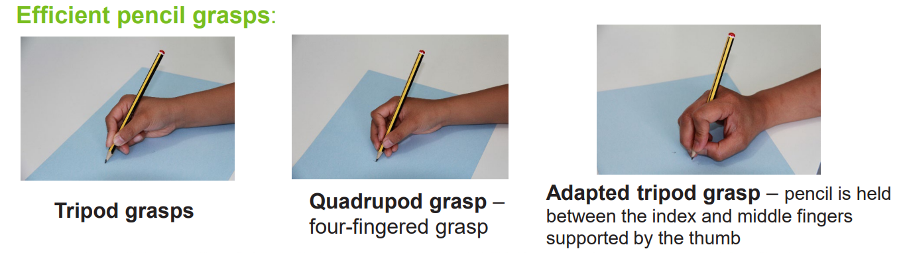
An inefficient pencil grasp limits the movement of the pencil/pen making it challenging for the child to produce neat writing, complete written work in time and may cause discomfort or fatigue.

To develop the correct grip there are some different activities that you can do – see the pinching and grasping section of this website.
Our Occupational Therapist’s have created this video on Pencil grips and Writing aids Pencil Grip and Writing Aids to highlight some equipment that might help.
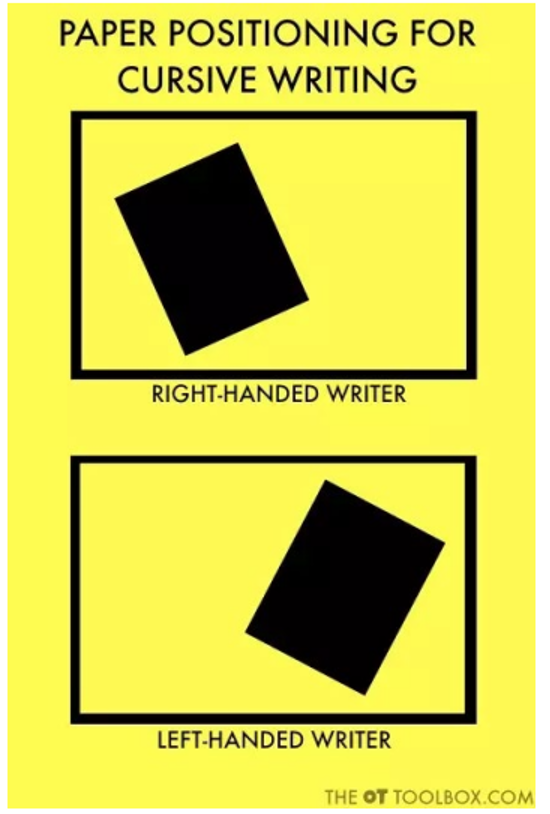
3. Paper position
What you want to see:
- Right-handers– angle the paper to the left
- Left-handers– angle the paper to the right and move it to the left
What can you do:
- Seating plan – Left handers to face forwards on the left-hand side of the classroom
- Encourage the use of the other hand to hold the paper when writing
- Give verbal prompting / reminders or print a visual prompt of this on their desk
4. Pencil pressure
What you might see:
- Using appropriate pencil pressure improves fluency and reduces the risk of pain and discomfort when writing
- Heavy pencil pressure: can cause pain and fatigue in the hands and can increase the amount of time it takes to write
- Light pencil pressure: this can make the child’s writing difficult to read as the words are barely readable.
What can you do:
For children who use too much force / pressure:
- Trial alternative pens/pencils, e.g. weighted pen/pencil, retractable pencil
For children who use less force / pressure:
- Use softer leaded pencils so that writing appears darker.
- Ask the child to write a word very lightly on the paper and erase it without leaving marks
- Warm up by squeezing a stress ball
Top tip: Complete pushing, pulling and pinching activities, these activities provide increased sensory feedback to the joints and muscles and can help children who use either too much or too little pressure. Please look at these ideas on Theraputty Exercises for Hand Strength & Proprioceptive Input.
5. Placement & Letter Formation
What you want to see
- Letters sit on the line with good alignment of ascending and descending letters
- Consistent size and spacing of letters and words
What can you do
Stages of teaching letter formation:
- Imitation – an adult demonstrates how to write the letter and the child imitates
- Copying – the child copies a letter which is already written
- Independent letter formation without copying
- Teach them letter formation in groups of similar formations. For example, curly letters = c, a, d, g, o, s. Diving letter = b, r, m, n, p, h. Zig-zag letters = v, z, w, x, y, k.
- Give the child an alphabet sheet to keep next to them as a visual prompt to help them with independent letter formation.
- Be consistent with the style of writing, e.g. decide whether to use print or cursive, taking into account the child’s preference and the legibility of their writing.
- It is important to first work on the quality of writing, e.g. correct letter formation, before focusing on the speed of writing
Finally...
You may wish to consider alternatives to handwriting. Handwriting is an important skill to learn. However, for some children it is not always the most effective method of recording work. When handwriting becomes a barrier to a child reaching their academic potential and/or is impacting on their confidence, alternatives to writing should be explored.
Typing and alternative methods for handwriting:
- Typing on a keyboard – try this free online touch-typing course from Typing Club or play some typing games such as:
- Dance Mat Typing game from BBC Bitesize.
- Keyboard Jump from Typing.com
- Ghost typing from ABCya
- Computer/laptop’s can be used to write longer pieces of work
- Dictation – different dictation software packages are available, or a Dictaphone can be used
- Scribe – a child can record some of their work verbally and an adult write it for them
- Clicker – this is a child-friendly word processor
- Use diagrams and mind maps where possible
- Write key points when taking notes and use answer sheets where gaps need to be filled in. Photocopy notes where possible
- Allow extra time for the child to write
You can find more information in our guide on Touchtyping Programmes.


